一.在EditText左侧添加图片
如
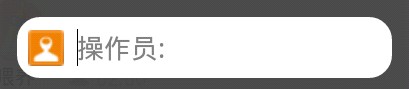
其原理就是在相对布局(RelativeLayout)的基础上用ImageView实现
代码如下:
<RelativeLayout>
				<EditText android:id="@+id/edt_operator_name" style="@style/syncEditText"
					android:hint="@string/hint_operator_name" />
				<ImageView android:id="@+id/syncOperatorImg" style="@style/syncImageView"
					android:layout_alignLeft="@+id/edt_operator_name"
					android:layout_alignTop="@+id/edt_operator_name"
					android:layout_alignBottom="@+id/edt_operator_name" android:src="@drawable/sync_operator" />
			</RelativeLayout>
让syncOperatorImag的左部,上部和下部与edt_operator_name对齐。
也可以直接使用 android:drawableLeft="@drawable/ic_launcher"来设置 EditText左边的图片
二.EditText圆角
首先定义一个圆角xml,路径:res/drawable/rounded_edittext.xml
<?xml version="1.0" encoding="utf-8"?>
<shape xmlns:android="http://schemas.android.com/apk/res/android"
	android:shape="rectangle" android:padding="10dp">
	<solid android:color="#FFFFFF" />
	<corners android:bottomRightRadius="15dp"
		android:bottomLeftRadius="15dp" android:topLeftRadius="15dp"
		android:topRightRadius="15dp" />
</shape>
也可以直接使用<corners android:radius="7dip" />来一次设置四个角的弧度
把EditText的background属性设置为刚刚建立的xml
显示控件的xml中
<EditText android:id="@+id/edt_operator_name" style="@style/syncEditText"
					android:hint="@string/hint_operator_name"
android:background="@drawable/rounded_edittext"
android:layout_width="250dip"
android:layout_height="wrap_content"
android:paddingTop="10dip"
android:paddingBottom="10dip"
android:gravity="center_vertical" />
分享到:


相关推荐
对EditeText的美化,非常简单的实现浮动标签EditText:Android视图使用EditText之上,并提示EditText时填充文本。核心代码不超过50行
学习有关Android EditText属性
EditText焦点的自动跳转,输入完一个EditText焦点自动跳转到下一个EditText
大家在做商城购物类的APP时,肯定遇到过需要自定义带加减的EditText 那么我上传的这个自定义的EditText: 1.可以根据个人的实际UI需求,修改成自己喜欢的颜色和形状。 2.里面的加和减的业务逻辑判断已完善,大部分...
EditText禁止粘贴内容输入,修改粘贴内容, 参考: 禁止EditText 输入粘贴版内容 http://blog.csdn.net/xiaobijia/article/details/41081595
android EditText
EditText监听输入完成,监听edittext,精确判断什么时候输入完成
android+滚动Edittextandroid+滚动Edittextandroid+滚动Edittextandroid+滚动Edittextandroid+滚动Edittextandroid+滚动Edittextandroid+滚动Edittextandroid+滚动Edittextandroid+滚动Edittextandroid+滚动Edittext
注册时每个EditText里面都输入内容后 注册按钮才能点击
android listview带有editText的情况,解决editText的焦点问题,及数据错位问题。后2个包没用。
Edittext动画 代码
给你带来一个不一样的EditText,主要用户登录注册反正你想到的地方
EditText的使用案例, 例子中一共三个EditText, 填写了充值金额和赠送金额之后,失去其中一个的焦点第三个EditText会自动变化
修改EditText的hint,主要为hint的字体大小的修改。
酷炫动画,edittext文字飞入效果
带清除图标的 EditText ( 自定义EditText
Android 监听EditText变化事件
android EditText禁止输入法表情,完美解决表情不能屏蔽的情况,不存在个别表情屏蔽不了的情况,不明白的地方可以参考我的博客。
Edittext限制数字、字母已经很好解决,这里为你提供了限制输入Emoji表情符的Edittext设置。
EditText是UI界面中的重要控件,它主要是用来传输数据,所以本文档总结了相关的用法,希望对你有用。